File system
Support big file
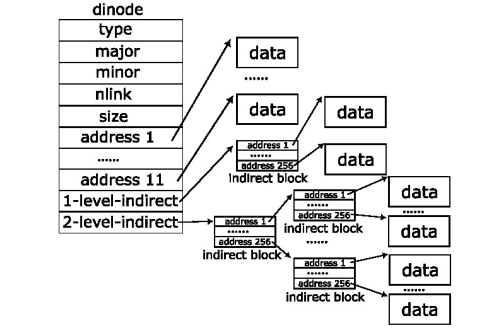
其实,我们根据老师的提示我们就可以得知:这个其实就是减少一个Direct Block,增加一个Indirect Block,但是这个却不是简单的one-level indirect block,而是two-level indirect block.
我们可以简单验证一下:
\[11 + 256 + 256 \times 256 = 65803\]由此,我们的dinode的结构由:
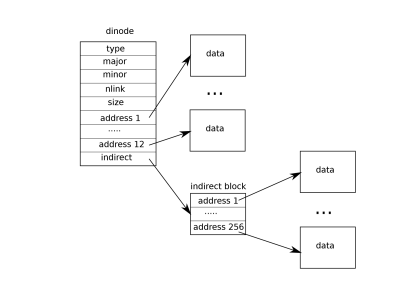
变为:
那么,我们的思路就简单了,就是修改涉及到dinode结构体的地方,主要是:fs.h, fs.c, file.h.
解题思路
- 首先是我们先修改
fs.h:
#define NDIRECT 11
#define NINDIRECT (BSIZE / sizeof(uint))
#define MAXFILE (NDIRECT + NINDIRECT + NINDIRECT * NINDIRECT)

// On-disk inode structure
struct dinode {
  short type;              // File type
  short major;             // Major device number (T_DEVICE only)
  short minor;             // Minor device number (T_DEVICE only)
  short nlink;             // Number of links to inode in file system
  uint size;               // Size of file (bytes)
  uint addrs[NDIRECT + 2]; // Data block addresses
};
- 接着就是修改
file.h中struct inode中的the copy of struct dinode:
// in-memory copy of an inode
struct inode {
  uint dev;           // Device number
  uint inum;          // Inode number
  int ref;            // Reference count
  struct sleeplock lock; // protects everything below here
  int valid;          // inode has been read from disk?

  short type;         // copy of disk inode
  short major;
  short minor;
  short nlink;
  uint size;
  uint addrs[NDIRECT+2];
};
- 最后,我们就是修改
fs.c中的bmap函数以及itrunc函数:
其实,修改这两个函数很简单,我们只需要理解这个函数就行.
这个理解你可以简单的看这个函数的思路是怎么样,不细究背后涉及到的整个的文件系统的逻辑.
我们可以简单的通过模仿上面的已经有的关于Direct Block和one-level indirect block的代码,来实现two-level indirect block.
最后,我们整体的bmap函数变为:
static uint
bmap(struct inode *ip, uint bn)
{
  uint addr, *a;
  struct buf *bp;

  // first level: 0 to 10
  if(bn < NDIRECT){
    // if first level block not allocated, allocate it
    if((addr = ip->addrs[bn]) == 0){
      addr = balloc(ip->dev);
      if(addr == 0)
        return 0;
      ip->addrs[bn] = addr;
    }
    return addr;
  }
  bn -= NDIRECT;  // sub 11

  // second level: 11 to 267
  if(bn < NINDIRECT){
    // Load indirect block, allocating if necessary.
    if((addr = ip->addrs[NDIRECT]) == 0){
      addr = balloc(ip->dev);
      if(addr == 0)
        return 0;
      ip->addrs[NDIRECT] = addr;
    }
    bp = bread(ip->dev, addr);
    a = (uint*)bp->data;
    if((addr = a[bn]) == 0){
      addr = balloc(ip->dev);
      if(addr){
        a[bn] = addr;
        log_write(bp);
      }
    }
    brelse(bp);
    return addr;
  }
  bn -= NINDIRECT;

  // third level: 268 to 65803
  if(bn < NINDIRECT * NINDIRECT){
    // Load the second indirect block, allocating if necessary.
    if((addr = ip->addrs[NDIRECT+1]) == 0){
      addr = balloc(ip->dev);
      if(addr == 0)
        return 0;
      ip->addrs[NDIRECT+1] = addr;
    }
    bp = bread(ip->dev, addr);
    a = (uint*)bp->data;

    // example: bn = 258
    // index_lvl1 = 258 / 256 = 1(second-level indirect block)
    // index_lvl0 = 258 % 256 = 2(third data block)
    uint index_lvl1 = bn / NINDIRECT;
    uint index_lvl0 = bn % NINDIRECT;

    if((addr = a[index_lvl1]) == 0){
      addr = balloc(ip->dev);
      if(addr == 0){
        brelse(bp);
        return 0;
      }
      a[index_lvl1] = addr;
      log_write(bp);
    }
    brelse(bp); // free the block of second indirect block

    bp = bread(ip->dev, addr);
    a = (uint*)bp->data;
    if((addr = a[index_lvl0]) == 0){
      addr = balloc(ip->dev);
      if(addr){
        a[index_lvl0] = addr;
        log_write(bp);
      }
    }
    brelse(bp);
    return addr;
  }

  panic("bmap: out of range");
}
itrunc同理,而且更简单,无需修改原有的,只需添加:
  if(ip->addrs[NDIRECT+1]){
    // read the second indirect block
    bp = bread(ip->dev, ip->addrs[NDIRECT+1]);
    a = (uint*)bp->data;

    // traverse each first level block pointer
    for(int i = 0; i < NINDIRECT; i++){
      if(a[i]){
        // read the first level block
        struct buf *bp2 = bread(ip->dev, a[i]);
        uint *a2 = (uint*)bp2->data;

        // traverse and free each data block
        for(int j = 0; j < NINDIRECT; j++){
          if(a2[j])
            bfree(ip->dev, a2[j]);
        }
        brelse(bp2);
        bfree(ip->dev, a[i]); // free the first level block
      }
    }
    brelse(bp);
    bfree(ip->dev, ip->addrs[NDIRECT+1]); // free the second level block
    ip->addrs[NDIRECT+1] = 0;
  }
Symbolic Link
关于创建新的系统调用这个就不过多解释了,就是按照lab2的流程走一次
- 首先就是增加新的文件类型,在
stat.h中增加:
#define T_SYMLINK 4 // Symlink
- 接着,就是按照提示在
fcntl.h新增用于open函数的标志位:
因为symlink的文件内容就是字符串,字符串内容就是它所指向的路径.
我们open文件的时候就会需要考虑打开的是哪个文件来显示他的data,所以我们需要新增一个标志位来区分.
#define O_NOFOLLOW 0x800
- 最后,我们就是在
sysfile.c中新增sys_symlink函数以及修改sys_open函数:
uint64
sys_symlink(void)
{
  char target[MAXPATH], path[MAXPATH];
  struct inode *ip;

  // get the arguments
  if(argstr(0, target, MAXPATH) < 0 || argstr(1, path, MAXPATH) < 0)
    return -1;

  // create the symlink inode
  begin_op();
  ip = create(path, T_SYMLINK, 0, 0);
  if(ip == 0){
    end_op();
    return -1;
  }

  // write the string file path data into the symlink inode
  if(writei(ip, 0, (uint64)target, 0, strlen(target)) != strlen(target)){
    iunlockput(ip);
    end_op();
    return -1;
  }

  iunlockput(ip);
  end_op();
  return 0;
}
sys_open函数中增加如下代码段:
这一部分,我们只需要在omode & O_CREATE为false的else部分,因为我们创建的symlink file,并不是普通文件
    // check the type of the file and the open mode bit
    // when the omode has O_NOFOLLOW flag,
    // do not follow symlinks to show the string data of the symlink itself
    if(ip->type == T_SYMLINK && !(omode & O_NOFOLLOW)){
      int depth = 0;
      while(ip->type == T_SYMLINK){
        // recursion depth limit to avoid infinite loops
        if(depth >= 10){
          iunlockput(ip);
          // end the log transaction
          end_op();
          return -1;
        }

        // read the target path from the symlink inode
        char target[MAXPATH];
        int n = readi(ip, 0, (uint64)target, 0, MAXPATH);
        if(n < 0){
          iunlockput(ip);
          end_op();
          return -1;
        }
        target[n] = 0;

        // swap the inode
        iunlockput(ip);
        if((ip = namei(target)) == 0){
          end_op();
          return -1;
        }
        ilock(ip);
        depth++;
      }
    }
这样,我们就完成了symlink的实现.
总结
通过这次的实验,再次被Unix/Linux的设计哲学思想所折服,遵循了everything is file以及我认为底层的数据结构也是everything is array.
应该可以说:
Everything is a file 是 API 层的统一抽象
Everything is an array 是内核实现层的数据结构
实验二的实际的验证:
echo "hello world" > readfile
ln -s readfile link
.rw-r--r-- ice ice 9 Dec 12:25 readfile
lrwxrwxrwx ice ice 9 Dec 12:25 link -> readfile
cat link
hello world

readlink link
readfile
stat link

File: link -> readfile
Size: 8         	Blocks: 0          IO Block: 4096   symbolic link
Device: 8,6	Inode: 2361792     Links: 1
Access: (0777/lrwxrwxrwx)  Uid: ( 1000/     ice)   Gid: ( 1000/     ice)
Access: 2025-12-09 12:25:36.623344027 +0800
Modify: 2025-12-09 12:25:35.876677352 +0800
Change: 2025-12-09 12:25:35.876677352 +0800
Birth: 2025-12-09 12:25:35.876677352 +0800

stat -L link

File: link
Size: 12        	Blocks: 8          IO Block: 4096   regular file
Device: 8,6	Inode: 2366249     Links: 1
Access: (0644/-rw-r--r--)  Uid: ( 1000/     ice)   Gid: ( 1000/     ice)
Access: 2025-12-09 12:25:26.516677246 +0800
Modify: 2025-12-09 12:25:25.726677237 +0800
Change: 2025-12-09 12:25:25.726677237 +0800
Birth: 2025-12-09 12:25:25.726677237 +0800
之前在捣鼓旧机子的时候,就简单了解过GPT分区和MBR分区.
MBR分区会有一个mbr gap来辅助引导boot,否则就无法正常boot开机.GPT分区为了向只能BIOS引导的旧机子,产生了一个protective mbr分区,简单来说就是为了兼容和保护gpt磁盘
详情可以了解protective mbr这篇文章
关于文件系统能讲的东西太多了,包括文件系统的实现类型:ext2,ext4,xfs,btrfs等等,还有日志文件系统,以及各种各样的优化技术.
还有在文件系统之下的分区,卷,卷组等等
[!Note]
- 将硬盘分区,并将其初始化为 物理卷(PV)。
- 将物理卷加入到一个 卷组(VG) 中。
- 在卷组中创建 逻辑卷(LV)。
- 在逻辑卷上创建文件系统(如 Ext4、XFS 等)。
- 将逻辑卷 挂载 到系统目录中,以便访问和存储数据。
将Linux作为主力系统使用了接近2年多的时间,我觉得自认为Linux就应该成为每个人的日常操作系统,而不是使用什么クソゴミ的 windows 系统😄😄